
Paper Circuit with LED: A Fun & Easy Electronics Project for Kids
- Feb 19, 2025
- 3 min read
Ever wanted to make a greeting card that glows? With this Paper Circuit with LED project, kids will learn about electricity and circuits while creating a fun, light-up design using just copper tape, LEDs, and a battery!
Want to explore more fun STEM projects? Check out our STEM Learning Program for Grades 2-12!
Table of Contents:
Introduction to Paper Circuits
Paper circuits are a fun and easy way to learn about electricity without using complex wires or breadboards! By using copper tape and LEDs, kids can design their own glowing greeting cards, bookmarks, or paper crafts.
Related Topic: Want to explore another easy circuit project? Check out our Simple Circuit Model and build a working electric circuit!
Did You Know?
Copper is one of the best conductors of electricity, which is why it’s used in almost all electronic devices!
LED lights use 90% less energy than regular bulbs, making them super energy-efficient!
How Do Paper Circuits Work?
A paper circuit works just like a normal circuit, but instead of wires, it uses copper tape to carry electricity! When you connect a coin cell battery to an LED, electricity flows through the circuit and lights up the LED.
Key Concepts Kids Will Learn:
Conductors & Insulators – Copper tape conducts electricity, while paper does not.
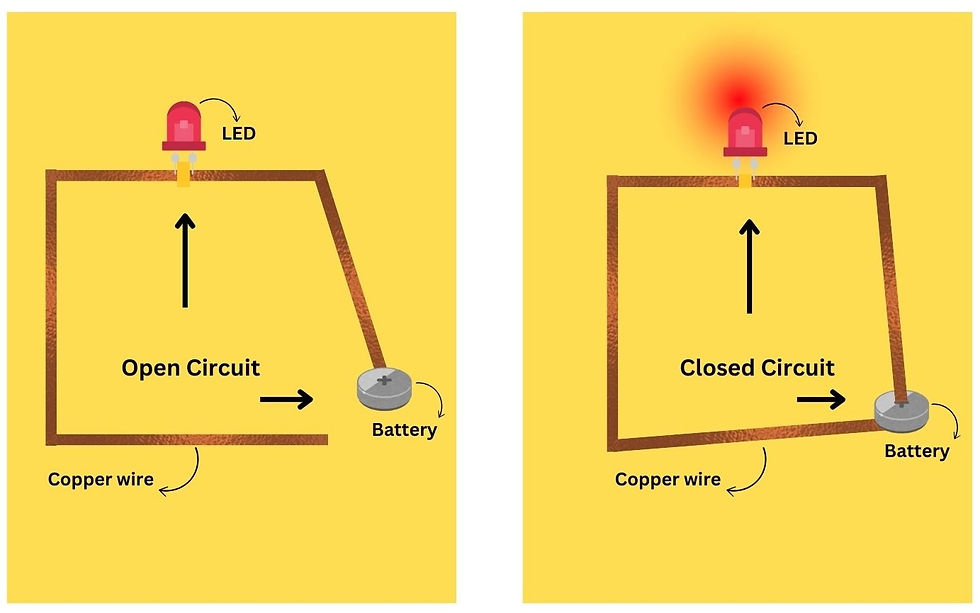
Complete & Incomplete Circuits – A circuit must be closed for electricity to flow.
Polarity of LEDs – LEDs have a positive (+) and negative (-) side, which must be connected correctly.
Materials Required
Here’s what you need to create a Paper Circuit with LED:
Name | Quantity | Component Description |
Copper Tape | 1 roll | Conducts electricity like wires |
LED Light (Small) | 1-2 | Lights up when connected to a battery |
Coin Cell Battery (3V) | 1 | Powers the LED circuit |
Thick Paper or Cardstock | 1 | Base for designing the circuit |
Scissors & Tape | 1 pair | For cutting and securing components |
Markers & Stickers | Optional | To decorate the glowing greeting card |
Want to learn more about electronics & circuits? Explore our Electronics & Robotics Camp!
Step-by-Step Guide: How to Make a Paper Circuit
1. Design Your Paper Circuit
Draw your design on a piece of cardstock (e.g., a greeting card).
Mark where you want the LED light to glow.
Plan your circuit path using copper tape.
2. Lay Down Copper Tape
Stick the copper tape along your drawn path.
Make sure the copper tape lines do not overlap (this can cause short circuits).
3. Attach the LED
Place the LED legs on the copper tape.
Match the longer leg (+) to the positive path and the shorter leg (-) to the negative path.
Secure it with tape.
4. Connect the Battery
Stick the coin cell battery at the battery mark.
Press the copper tape onto the battery to complete the circuit.
5. Test & Decorate!
Press down on the battery to see the LED light up!
Decorate your card with stickers, drawings, or messages.
The Science Behind Simple Circuits
A paper circuit works by allowing electricity to flow in a closed loop. The battery provides energy, and the copper tape carries this energy to the LED, making it glow!
Why Use Copper Tape?
Material | Conductivity | Used In |
Copper Tape | High | Paper Circuits, Electronics |
Wires | High | Electrical Circuits |
Paper | None | Acts as an insulator |
Adding Creativity: Fun Designs & Customization
Once your paper circuit is working, let’s make it more creative! Here are some ideas:
Greeting Card – Write a message that glows!
Bookmark with Light – A DIY glowing bookmark for reading!
Paper City Model – Make streetlights glow in a paper town!
Challenge: Can you create a multicolored paper circuit using multiple LEDs? Try it out!
Conclusion
The Paper Circuit with LED project is a simple yet exciting way for kids to explore electronics and electricity. Whether making a glowing greeting card or a fun paper craft, this activity is perfect for young innovators!
Want more hands-on experiments? Check out our Magnetism Exploration and discover how magnets work!
Ready to take your learning further? Join our Advanced STEM & Robotics Program for Grades 2-12 and build exciting projects!
FAQs
1. What is a paper circuit used for?
Ans. Paper circuits help students learn basic electronics in a fun and creative way.
2. Why does my LED not light up?
Ans. Check if:
The battery is properly connected.
The LED legs are placed correctly.
The copper tape has gaps in the circuit.
3. Can I use different colors of LEDs?
Ans. Yes! You can use red, blue, green, or multicolor LEDs to make your design unique.
4. Can I add more than one LED to my circuit?
Ans. Yes, but you will need more power (stronger battery) or a parallel circuit setup.


Comments